Basic User Management Guide
This guide walks through the first administrative steps after logging in to OTPKI for the first time: creating users, defining roles, setting permissions, organizing users into groups, and configuring approval profiles so that gated operations have the right people in the queue.
:::note OIDC-managed deployments This guide covers the locally managed user model, where users and roles are created and maintained directly within OTPKI. Users and roles can alternatively be created and managed by a connected OIDC provider (e.g., Keycloak or EntraID). If your OTPKI deployment is configured to allow the OIDC provider to automatically create users and roles on sign-in, those accounts and roles will appear in OTPKI without manual creation. In that case you can skip Steps 1 and 2 and go directly to Step 3: Configure Role Permissions to define what those roles are allowed to do. :::
Step 1: Create Roles
Roles are reusable permission bundles. Define them first so they are available to assign when you create users.
- Navigate to Auth → Roles.
- Click Create.
- Enter a Name (e.g.,
PKI Administrator,Certificate Manager,Auditor) and an optional Description describing the job function the role represents. - Click Save.
Repeat for each role you need. You do not need to configure permissions yet — that is done in Step 3.
OTPKI ships with a super-admin system role. Use it only for break-glass access. Model day-to-day access with purpose-built roles.
Step 2: Create Users
- Navigate to Auth → Users.
- Click Create.
- Fill in the required fields:
- Username — unique login identifier
- First Name
- Last Name
- Email — unique email address
- Optionally add a Description.
- In the Roles picker, assign one or more roles from Step 1.
- Click Save.
Repeat for each user. You can also manage role assignments in bulk later via the Permissions screen (see Step 3).
If your organization uses an identity provider (e.g., Keycloak or EntraID), users can be created automatically on first sign-in. See Identity Providers for setup details. In that case, role assignments made here may be overwritten by the provider on subsequent sign-ins — manage roles in the provider itself.
Step 3: Configure Role Permissions
Roles have no access until you populate them with permission rules.
- Navigate to Auth → Permissions.
- On the Role Permissions tab, select a role from the left panel.
- Use the permission matrix to grant or deny access:
- Click a cell to cycle: Allow → Deny → Unset.
- The All Resources / All Actions cells in the top row and left column act as wildcards.
- Expand a resource row to set permissions on specific objects (e.g., a single CA).
- To start from a predefined baseline, use Apply template and choose the preset that best
matches the role's function (e.g.,
PKI/CA Administrator,Certificate Manager,Auditor).
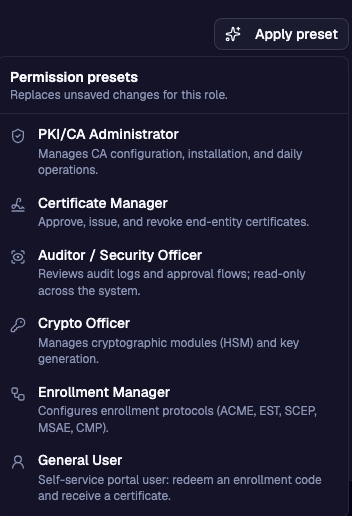
- Click Save to commit changes.
Repeat for each role.
:::info Permission resolution Deny beats allow when two equally specific rules conflict. More specific rules (object-level) override broader ones (resource-level or wildcard). A user with no roles has no access at all. :::
To assign roles to many users at once, switch to the User Assignments tab, select a user, and toggle checkboxes in the Role Assignments card.
Step 4: Create Groups
Groups let you refer to a set of users by a single name. They are used by approval profiles to designate approver pools.
- Navigate to Auth → Groups.
- Click Create.
- Enter a Name (e.g.,
PKI Approvers,Security Officers) and an optional Description. - Click Save.
To add members, go to Permissions → User Assignments, select a user, and check the group under Group Memberships — or edit the user directly and use the Groups picker.
Groups do not grant permissions. They are purely organizational and are only meaningful in contexts that key off group membership, such as approval profiles.
Step 5: Create Approval Profiles
Approval profiles define who must approve a gated operation and how many approvals are required before it can proceed. They reference the roles and groups you created in the previous steps.
- Navigate to Administration → Approval Workflows → Approval Profiles.
- Click Create.
- Enter a Name (e.g.,
Standard Issuance Approval) and a Description. - Set Number of Approvals Required — the minimum number of distinct approver actions needed.
- In the Approvers section, authorize who can approve:
- Approver Roles — all users holding the selected role(s) may approve.
- Approver Groups — all members of the selected group(s) may approve.
- Approver Users — specific individual users may approve.
- Click Save.
An approval profile saved with no approvers configured will leave work items permanently stuck in Waiting for Approval. Always assign at least one approver role, group, or user.
Attaching an Approval Profile
Once created, attach the profile to the resource whose operations should be gated:
| Resource | Where to set it |
|---|---|
| Certificate Profile | Profiles → Certificate Profiles → Edit → Approval section |
| Certificate Authority | Certificate Authorities → Edit → Approval Profile field |
| End Entity Profile | Enrollment → End Entity Profiles → Edit → Approval Profile field |
Summary
| Step | What Was Configured |
|---|---|
| 1 | Roles — reusable permission bundles |
| 2 | Users — individual accounts with role assignments |
| 3 | Permissions — role access rules via the matrix |
| 4 | Groups — user collections for approval pools |
| 5 | Approval Profiles — gated operation rules tied to roles and groups |
Related Pages
- Users
- Roles
- Groups
- Permissions
- Approval Profiles
- 3-Tier PKI Tree Guide — next step after user management is set up